Integrating with VostroPay on your website
Purpose
This article will outline what is needed to replace your
existing Vault integration with a VostroPay (Till Payments) integration. You will have the choice
of either taking a payment at the time of booking or saving card details to be
charged in the future (like your existing Vault implementation).
We have two options to choose from:
- Simple Integration - our API will do most of the work for you (either saving card details for future payments, or taking a payment)
- Full Control Integration - you will integrate directly with the Payment Gateway and have full control over styling, display and event handling, and be able to take a payment at the time of booking.
We also have further information about Merchant Fees which will apply to both options, see at the end of this article.
OPTION 1 - Simple Integration
This option is the quickest and easiest way to get up and running with VostroPay in your website.
Note that you can choose from two transaction types:
1. "cardregistration" - Create a credit card registration token which will allow you to create payments and authorisations via RCM later in the booking process.
2. "payment" - Take a payment, either for the full balance or a deposit. This will also create a card registration token which can be used to create payments via RCM later in the booking process.
1. Start the Transaction
After your API booking call has succeeded, call our v3.2 API method createpaymenttransaction with the following parameters:
- var jsonStr = JSON.stringify({
- "method": "createpaymenttransaction"
- , "reservationref": "rcmReservationRef" //the reservationref field that is returned from the booking API method
- , "paymentgatewaytype": "VOSTROPAY"
- , "transactiontype": "cardregistration" //either "cardregistration" or "payment"
- , "amount": 0 //0 for cardregistration, total payment amount including merchant fee if collecting a payment.
- , "merchfeeid": 0 //merchant fee id from RCM if your payment amount includes a merchant fee. See below for more information regarding merchant fees
- , "merchfeeamount": 0 //merchant fee amount if your payment amount includes a merchant fee. See below for more information regarding merchant fees
- , "payscenario": "1" //1=at the time of making the booking, 2=when a quotation is converted to booking, 3=at any other time after the initial booking
- , "paysource": "your payment source here" //descriptive text for the source of this card registration, e.g. your website
- , "emailoption": "1" //0=no email, 1=default behaviour, 2=always send - if transaction is successful then the confirmation email will be sent to the customer
- });
This API method will return various fields, the one that you are interested in is the "RedirectUrl". See sample response below:
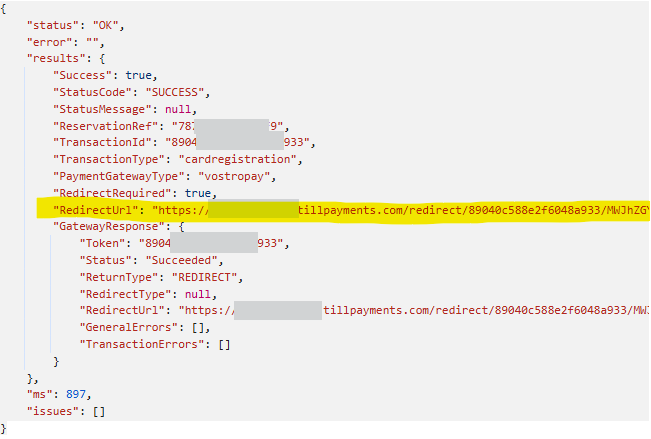
2. Load the Credit Card Input Page
Using our API response, find the "RedirectUrl" output. This is an HTML page that will have all the card entry fields. You will need to host this page within an IFrame on your own page.
e.g. HTML:
- <iframe src="about:blank" id="paymentIFrame" style="width: 100%; height: 600px;"></iframe>
e.g. Javascript:
- document.getElementById('paymentIFrame').src = data.results.RedirectUrl;
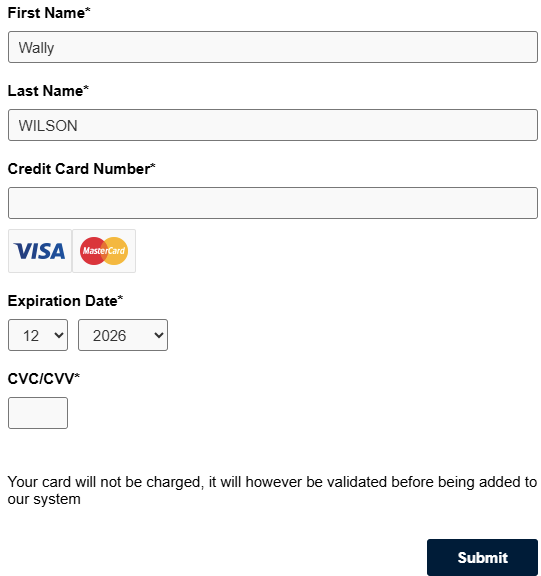
Your IFrame will display the credit card input screen as follows:
3. Listen for the Result
Your page that hosts the IFrame will need to register an event listener. The event type will be "VostroPayCallback", and the event.data will have a "result" of one of the following:
- "success" - payment taken, or card registered successfully, and recorded in RCM. Confirmation email has been sent where required.
- "success" - payment taken, or card registered successfully, and recorded in RCM. Confirmation email has been sent where required.
- "error" - the card was invalid or unable to be verified. The booking remains in RCM but it may not be in its final state, e.g. depending on your system settings, it may remain as a quotation. No email is sent to the customer.
- "cancel" - the user cancelled out of the process, as above the booking may not be in its final state.
- window.addEventListener("message", receiveMessage, false);
- function receiveMessage(event) {
- if (event.data.type && event.data.type === 'VostroPayCallback') {
- var result = event.data.result;
- if (result === 'success') {
- GoToConfirmation(); //booking process has ended successfully, show a nice summary screen
- } else {
- GoToBookedWithProblem(); //card registration was unsuccessful, but the booking still exists so provide a message asking customer to (perhaps) contact you to confirm next steps
- }
- }
- }
Note: If you'd like to verify the origin of the event, you can expect it to come from https://paymentcallback.rentalcarmanager.com
OPTION 2 - Full Control Integration
For advanced development - you will have full control over the display, styling and event handling by interacting directly with the payment gateway APIs. You will need to call our API once the card registration/payment has been finalised.
Website Changes
We recommend reviewing Till Payment's Gateway Documentation as a starting point. This will familiarise you with the high level concepts of the Till Payments API and prepare you for the technical integration. For API specifics, please see Till's API Reference V3 documentation.
Till Payments Integration Options
We recommend using Till’s Javascript Integration which will
let you embed a card entry form in your website and give you the most control
over payments/collecting card details. You also have the options of Full-Page Redirect and Hosted Payment Form integrations which may be simpler to implement but won't provide as seamless of a customer experience as the Javascript integration.
- Javascript integration - The most seamless experience for customers and the most flexible integration method in terms of styling/design.
- Hosted Payment Form - The card form is embedded in an iframe and hosted by Till, keeps users in your checkout but less flexible styling options.
- Full-Page Redirect - Redirects the customer from your checkout to a Till hosted page to collect card details. The user is then redirected back to your site after the transaction is complete.
You can read more about each of these integration methods here: https://gateway.tillpayments.com/documentation/gateway#transaction-process.
Saving Cards for Future Charges
If you need to save the card details to be charged in the future,
please ensure you have set the “withRegister” parameter when creating
your Debit request or you are using the Register transaction type if you do not need to take payment at the time of booking. To save a customer’s card details without charging them at the time of booking see the Register transaction type: https://gateway.tillpayments.com/documentation/apiv3?php#transaction-request-register.
You can read more about saving customer cards here: https://gateway.tillpayments.com/documentation/gateway#card-on-file-and-recurring-transactions.
3D Secure
We recommend enabling 3D Secure on transactions to help protect you (the merchant) from chargebacks/disputes with customers. 3D Secure is configured at the transaction level with Till, you can read more about 3D Secure here: https://gateway.tillpayments.com/documentation/gateway#3d-secure-authentication.
RCM API Calls
You will need to pass the results from Till to RCM to
record any payments and add any collected card details for use in RCM.
Payment
To save a Till payment call the “confirmpayment” RCM API method and pass in the following Till details:
Parameter | Value |
reservationref | Booking reference code returned from method booking. |
amount | Payment amount. |
success | Indicate if payment was successful. |
paytype | Payment type, like Visa or Mastercard. |
paydate | Payment date. |
supplierid | |
transactid | The Till transaction UUID (e.g., “abcde12345abcde12345”). |
dpstxnref | The Till transaction UUID (e.g., “abcde12345abcde12345”). |
cardholder | The cardholder’s name. |
paysource | Optional Payment Source eq. 'Payment from Web API3.x'. |
cardnumber | The last 4 digits of the card as returned by Till. |
| cardexpiry | The card expiry returned by Till in the format of “MM/YY”. |
transtype | The transaction type, in this case “Payment”. |
merchfeeid | Optional Merchant Fee ID corresponding to a Merchant Fee ID setup within the system. |
payscenario | Payment scenario when calling this method, possible values are: 1= at time of original booking (default), 2=convertquote, 3=prehire e.g. editbooking. |
emailoption | Email option, 0=never send email, 1=default behaviour, 2=always send email. |
billinglocationid | Optional Billing Location ID, if not passed it defaults to BillLocID system parameter. |
loginid | Login ID of the user who requests the payment. |
Example request body:
{"method": "confirmpayment","reservationref": "43F355C1223","amount": 500,"success": true,"paytype": "Credit Card","paydate": "01/01/2022","supplierid": 0,"transactid": "abcde12345abcde12345","dpstxnref": "abcde12345abcde12345","cardnumber": "9969","cardexpiry": "01/25","cardholder": "John Doe","transtype": "Payment"}
Card Registration Only (No Payment)
If you are only collecting the customer’s payment details for future usage, call the
“rebillingtoken” method with the following parameters:
Parameter | Value |
reservationref | Booking reference code returned from method booking |
paytype | Payment type, like visa or mastercard |
supplierid | |
paysource | Optional Payment Source eq. 'Payment from Web API3.x' |
rebillingtoken | The Till transaction UUID (e.g., “abcde12345abcde12345”). |
cardnumber | The last 4 digits of the card as returned by Till. |
cardexpiry | The card expiry returned by Till in the format of “MM/YY”. |
cardholder | The cardholder’s name. |
Example request body:
{"method": "rebillingtoken","reservationref": "43F355C1223","paytype": "Credit Card","supplierid": 0,"paysource": "Website","rebillingtoken": "abcde12345abcde12345","cardnumber": "9969","cardexpiry": "01/25","cardholder": "John Doe"}
MERCHANT FEES
For payments where you are including a merchant fee, the RCM Merchant Fee ID must be passed in with the request to either "createpaymenttransaction" or "confirmpayment" method, using parameter name "merchfeeid". The "amount" for both of these methods should be inclusive of the merchant fee value. Failure to do this will result in an incorrect balance on bookings as the merchant fee won't be listed.
Find Default Merchant Fee
To check the API for a default fee, use the method "tender_types", and look for a tender type with "isonlinepaymentdefault" = true. With this record, you should extract the "extrafee_id" (use to pass in to the API with the payment info) and "extrafee_fee" (percentage value) (use to calculate the amount of the merchant fee). There is also a tax flag which might be relevant to calculations.
- function SetMerchantFee() {
- var jsonStr = JSON.stringify({
- "method": "tender_types"
- });
- ajaxCall(jsonStr, function (apiresult) {
- if (apiresult.status === 'OK') {
- rcmTenderTypes = apiresult.results;
- $.each(rcmTenderTypes, function (index, tender) {
- if (tender.isonlinepaymentdefault === true) {
- if (tender.extrafee_id > 0) {
- rcmMerchantFeeId = tender.extrafee_id;
- rcmMerchantFeePercentage = tender.extrafee_fee;
- rcmMerchantFeeApplyTax = tender.extrafee_applytax;
- }
- return false; // break $.each once found
- }
- });
- } else {
- console.log(apiresult.error);
- }
- });
- }
Calculate Merchant Fee Amount
The calculated amount needs to allow for any non-inclusive taxes if necessary. See below for an example:
- function CalculateMerchantFee(baseAmount) {
- if (rcmMerchantFeeId > 0 && rcmMerchantFeePercentage !== 0) {
- var fee = baseAmount * rcmMerchantFeePercentage / 100.00;
- if (rcmMerchantFeeApplyTax && rcmTaxInclusive === false && rcmTaxRate > 0) {
- fee += rcmTaxRate * fee;
- }
- return fee;
- }
- return 0;
- }
When calling "createpaymenttransaction", pass in the merchant fee amount as a separate parameter "merchfeeamount". This is not mandatory but is passed to the payment gateway for reporting purposes.
Make sure that the "amount" always includes the merchant fee amount.
E.g. if base amount is $100 with a 2% merchant fee, then the customer pays $102 and you should pass in "amount" = 102 and "merchfeeamount" = 2.
Important Articles
- Whats New in RCM
- Getting Started with RCM
- Standard RCM Procedures
- Card Vault Deprecation 2025 – Frequently Asked Questions
Related Articles
Integrating with Stripe on your website
Purpose This article will outline what is needed to replace your existing Vault integration with a Stripe integration. You will have the choice of either taking a payment at the time of booking or saving card details to be charged in the future (like ...Integrating with Windcave on your website
Purpose This article explains how to integrate Windcave into your online booking module, allowing you to either take payment at the time of booking or merely register the customer’s card for future charges. We offer an integration method that doesn't ...Integrating with Paystack on your website
Purpose This article will outline what is needed to replace your existing Vault integration with a Paystack integration. You will have the choice of either taking a payment at the time of booking or saving card details to be charged in the future ...API V3.2 Booking Process
Overview The RCM API and Agent API allow you to make unallocated bookings for a specified vehicle category, for a specified pickup and drop off date. An unallocated booking is a booking that has been made for a particular category (e.g. small car), ...Export API Methods
Overview Rental Car Manager offers an Export API to export certain datasets. Each of the methods available is discussed below. For detailed information about getting started with connecting to the Export API, see the article Getting Started with ...