Setting up the Email Server
Purpose
Since June 2019 we have noticed that more and more emails are being incorrectly blocked as Spam by the larger email providers (like Gmail).
As such some emails being sent out of RCM using RCM’s email server may be incorrectly blocked as Spam and end up in the Spam folder in your customer’s email accounts.
There are two options that can be used to address this problem. You can use the new email relay or you can setup your own email service inside RCM.
Accessing the Email Servers Screen
You can access the Email Servers screen under the System Setup menu, please see the image below.
If you do not have this option on your menus contact your internal system administrator to give you the correct permissions.
New Email Relay
We have recently setup a new email relay to address the problems associated with incorrectly blocked email.
To enable this feature, first check to see if you have the relay stored in the email servers list.
If this email server is not present in your system, then click on the add email server button and copy the settings from the below image.
Once you have submitted this form, open it back up and send a test email to make sure it works.
Now that email delivery is working make sure the feature is turned on
To make sure that email doesn't get rejected by your clients, contact your domain name / DNS provider and ask them to add ip4:103.4.63.137 to their SPF record.
Set up your own
An advantage to this option is that the emails sent from RCM will also appear in your own 'Sent Items' folder. This ensures you can always see email sent from RCM from your own email program on your PC, Laptop or mail app on your phone.
PLEASE NOTE : To complete this setup please read this document carefully. As part of the setup you will need to know your own email server (SMTP) name, password and possibly other details relating to ports and application passwords.
If you do NOT have this information or are unsure how to complete the steps below please contact your ISP provider or your internal IT support person who will be familiar with how your email is hosted. (Our RCM support team do NOT have access to these details and cannot engage with your ISP on your behalf)
Setting up the Email Server
If you are sending emails from RCM using more than one email address, i.e., you are using your location email address rather than your company one, you will have to create a record for each email address being used.
You can create the new record by clicking on the Add Email Servers link shown in the image below marked with a 1.
You may need to contact your Email Provider in order to obtain the correct SMTP settings for your email account. In most cases the Help section on their website will contain these settings. See the Notes on the screen shot below for more assistance.
Once you have setup the record and sent a test email to make sure it all works, you can turn the feature on by clicking on the Turn On button shown in the image below marked with a 2.
If you need any information about either a Gmail or Outlook server including how to allow your Gmail account to allow less secure apps to use your email server, you can access it using the links shown in the image below marked with a 3.
Once you have clicked on the “Add Email Server” link you can enter your details in the screen shown below. All of the fields are mandatory. You will need to save the information before you can send a test email.
Once you have saved the information, if you edit the information, you should be able to see a Send Test Email button down the bottom of the screen, please see the image shown below.
We recommend that you send a test email for each of the records you setup before you turn this feature on.
Gmail Instructions
To use Google's email server, you first must ensure you have two factor authentication enabled and setup for your account. Most users will already have this setup.
To check go to your Google account page and scroll down to security. You can enable this setting here if it is off.
Next choose App Passwords to generate an app specific password
Scroll to the bottom and choose Select app -> Other (Custom name)
Call it something descriptive like PasswordForRCM. This name can be anything.
Copy down the password that will popup as you cannot access it after this step.
Enter your details into RCM, an example is provided below, substitute the email address and password from your account.
Submit and select edit to open the settings page again. Click Send at the bottom to test the account and RCM will now use your account to send all emails.
Office 365 Instructions
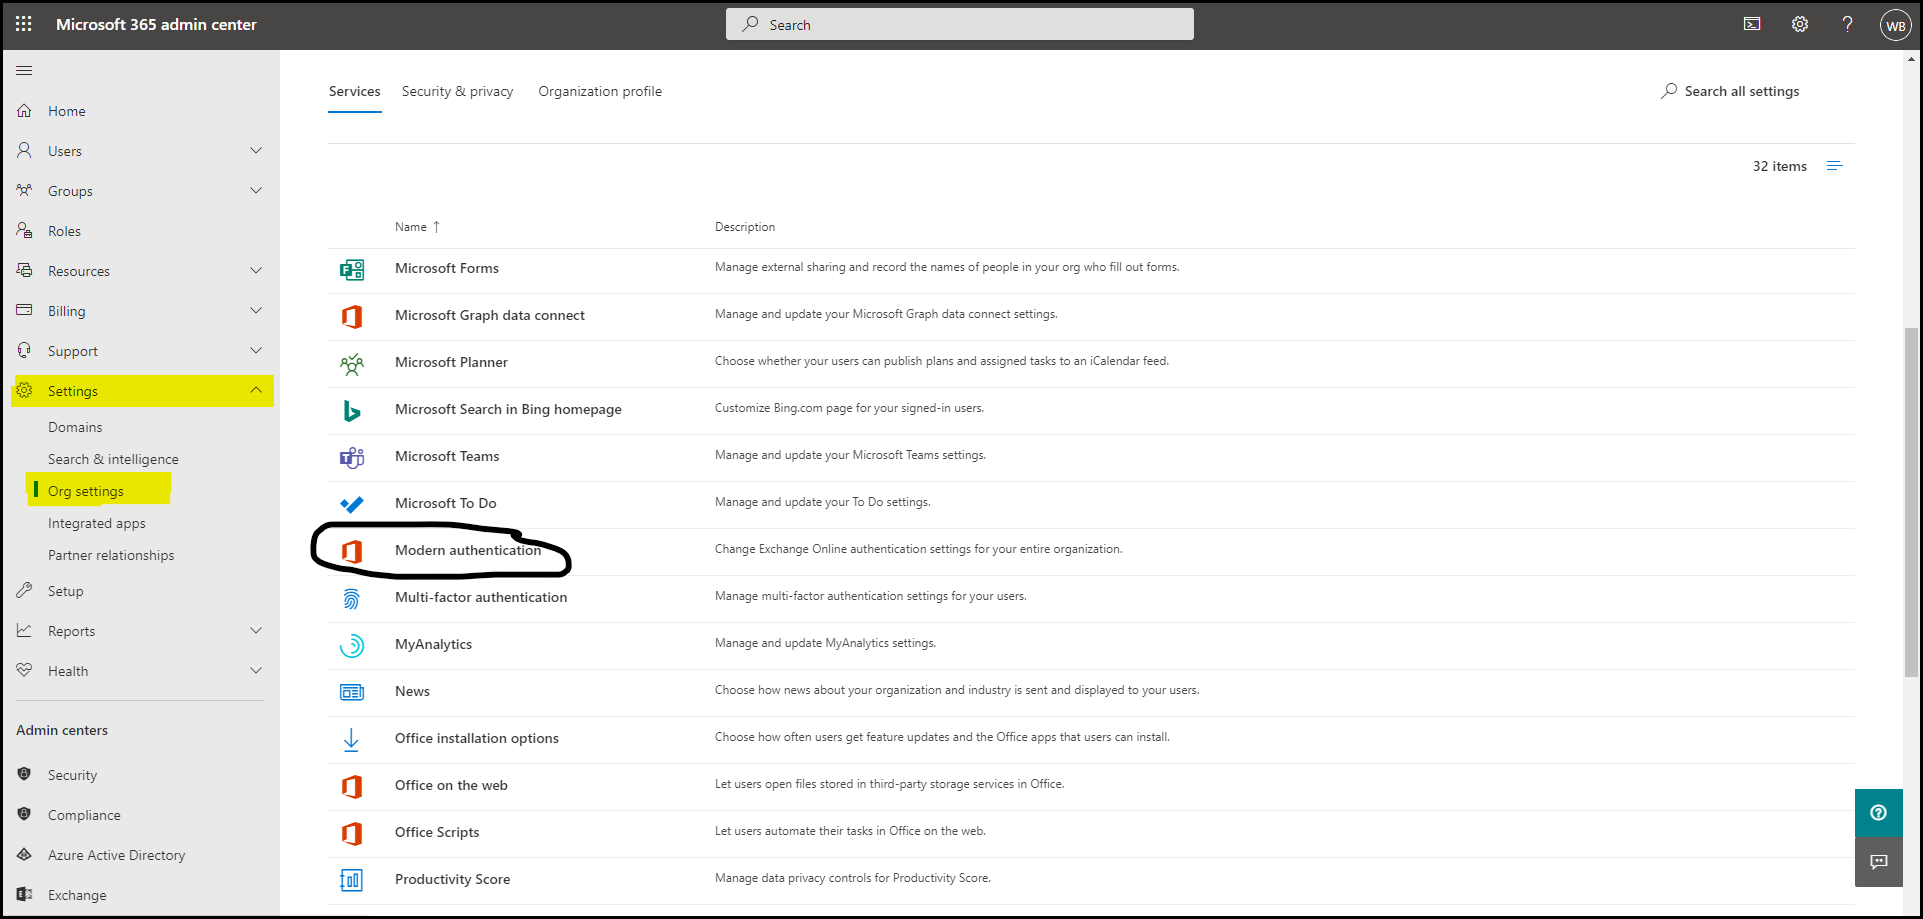
Office365 have implemented what they call "Modern Authentication" this is not supported by RCM and you will need to enable basic authentication first.
To do this just follow these steps:
Open up the Admin page in O365
Click Show all
Expand Settings, click Org Settings then scroll down and click on Modern Authentication.
If you receive the following warning, security defaults must be disabled in your Azure Active Directory. Use the links in the warning for further details
Check Authenticated SMTP if needed to allow access.
Then go to Users -> Active Users and select the user that you will add to RCM
On the flyout that appears check the box to allow Authenticated SMTP
Now you will be able to add your account in RCM, use the below example as a guide.
Submit and select edit to open the settings page again. Click Send at the bottom to test the account and RCM will now use your account to send all emails.
Important Articles
- Whats New in RCM
- Getting Started with RCM
- Standard RCM Procedures
- Card Vault Deprecation 2025 – Frequently Asked Questions
Related Articles
Additional Field "Is Active" added to the Email server list.
System Setup>Email Servers An additional field has been added to the Email Servers list to help identify the active server entries. The 'Is Active' field will display a tick if the entry in the table is Active. For full information on Email ...ID Check - Email Address
Overview You are able to setup which email address AplyID sends as the email to be used to send the confirmation email to once they have completed their check. Setting Up The Address This is done by adding a CC Email Address to one of the existing ...Credit Card Payment by Email
Purpose The Email Credit Card Link feature allows you to send your customers a link which they can follow to enter their credit card details. The credit card details entered will be used as a payment method for their reservation. Set up the Email ...Setting up your Web Booking Module
Overview There are typically two options available when installing the Rental Car Manager Web Booking Module. The first approach is to simply ‘style’ the supplied pages to match your existing website and then link to these pages directly from your ...Feb 2024: Additional Feature - Email Agreement After Online Check-In
RCM now allows for the automatic emailing of a booking's Rental Agreement to the customer, upon completion of the Online Check-In. If you wish to use this new email, please contact support@rentalcarmanager.com, for help integrating it into your ...